Migrate from PostgreSQL
The following guide is designed to help you smoothly transition your data and applications from a monolithic PostgreSQL database to YugabyteDB's distributed architecture. The guide walks you through the essential steps and best practices for migrating your data, including planning the migration, transforming your schema, migrating your data, and optimizing your applications for a distributed environment. By following these steps, you can minimize downtime, preserve data integrity, and leverage YugabyteDB's advanced features to meet your evolving business needs.
PostgreSQL compatibility
API compatibility
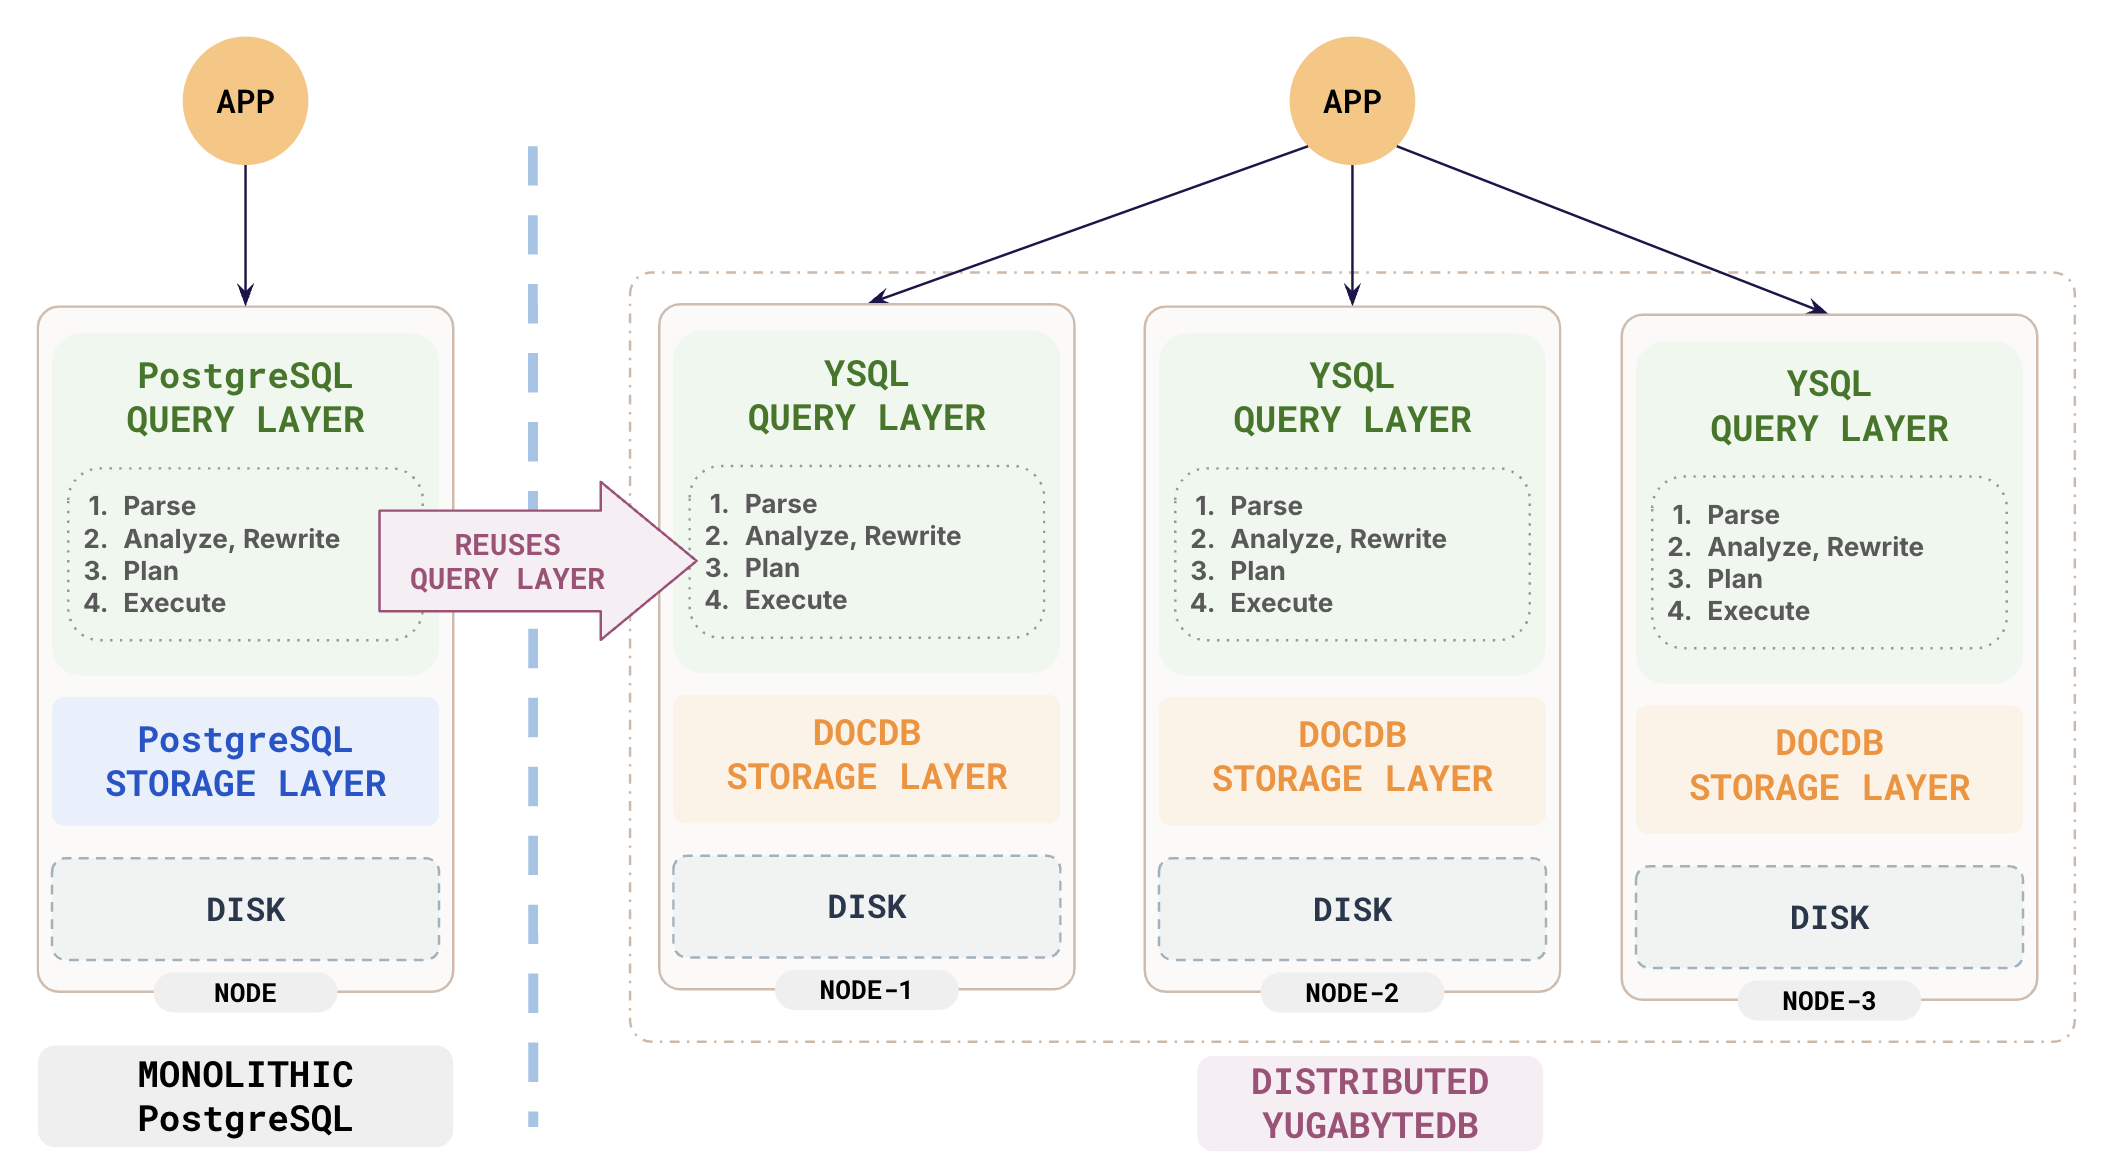
While YugabyteDB is a distributed database, it leverages PostgreSQL's query layer to provide the YSQL API that is wire-compatible and syntax-compatible with PostgreSQL.

Feature support
Implementing all PostgreSQL features in a distributed system can be challenging, and some features are still under development. To ensure that the features your applications depend on are supported in the version of YugabyteDB you are using, double-check that the feature is included in the list of supported features.
Extension support
PostgreSQL offers extensions that greatly enhance its capabilities, allowing users to tailor and extend its functionality according to their needs. YugabyteDB includes many, but not all, of these extensions. Double-check that the extensions used by your application are supported by YugabyteDB.
Data distribution schemes
PostgreSQL is a monolithic database that stores your data on a single machine, while YugabyteDB is a distributed SQL database that distributes table rows across nodes in the cluster using two data distribution methods: Hash sharding and Range sharding. This is a very key difference in modeling your data, as you have to understand how your data is distributed to write optimal queries to store and retrieve data.
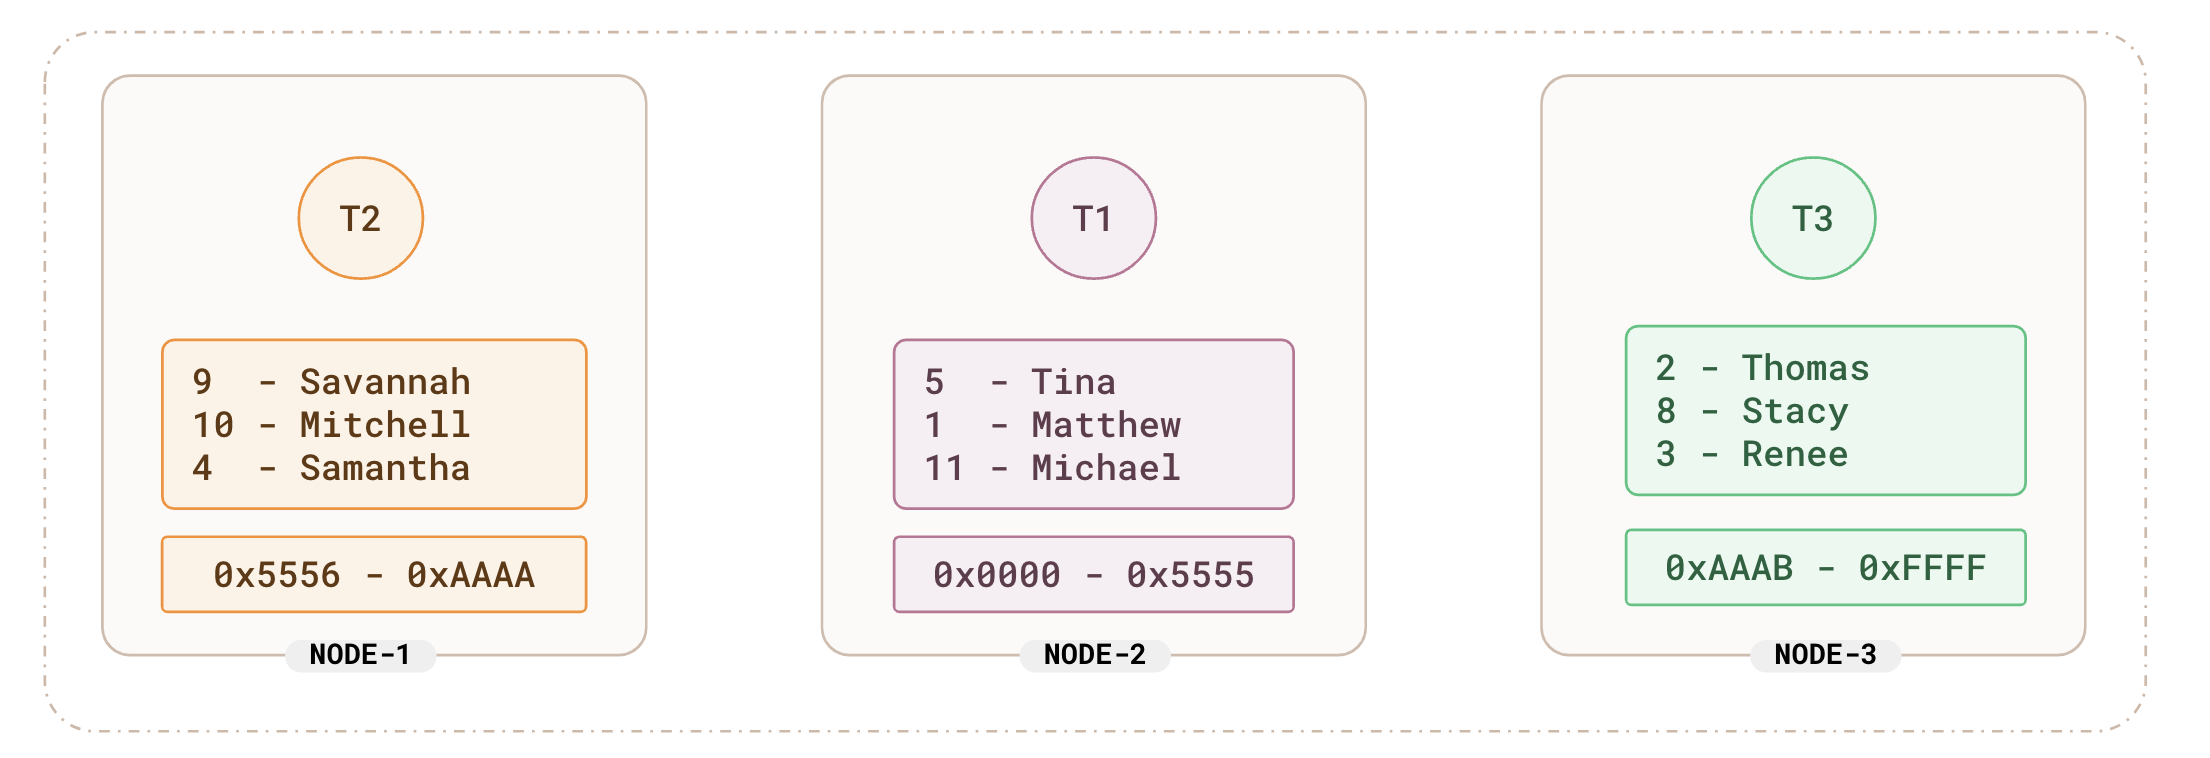
In hash sharding, rows are distributed based on a hash of the primary key and stored ordered on the hash of the primary key. This leads to a very good distribution of data but no useful ordering. This is great for point lookups like the following:
-- point lookup query
select * from users where id = 6;
For example, for a census table that is hash-sharded on the id of the person, the distribution could look something like the following:

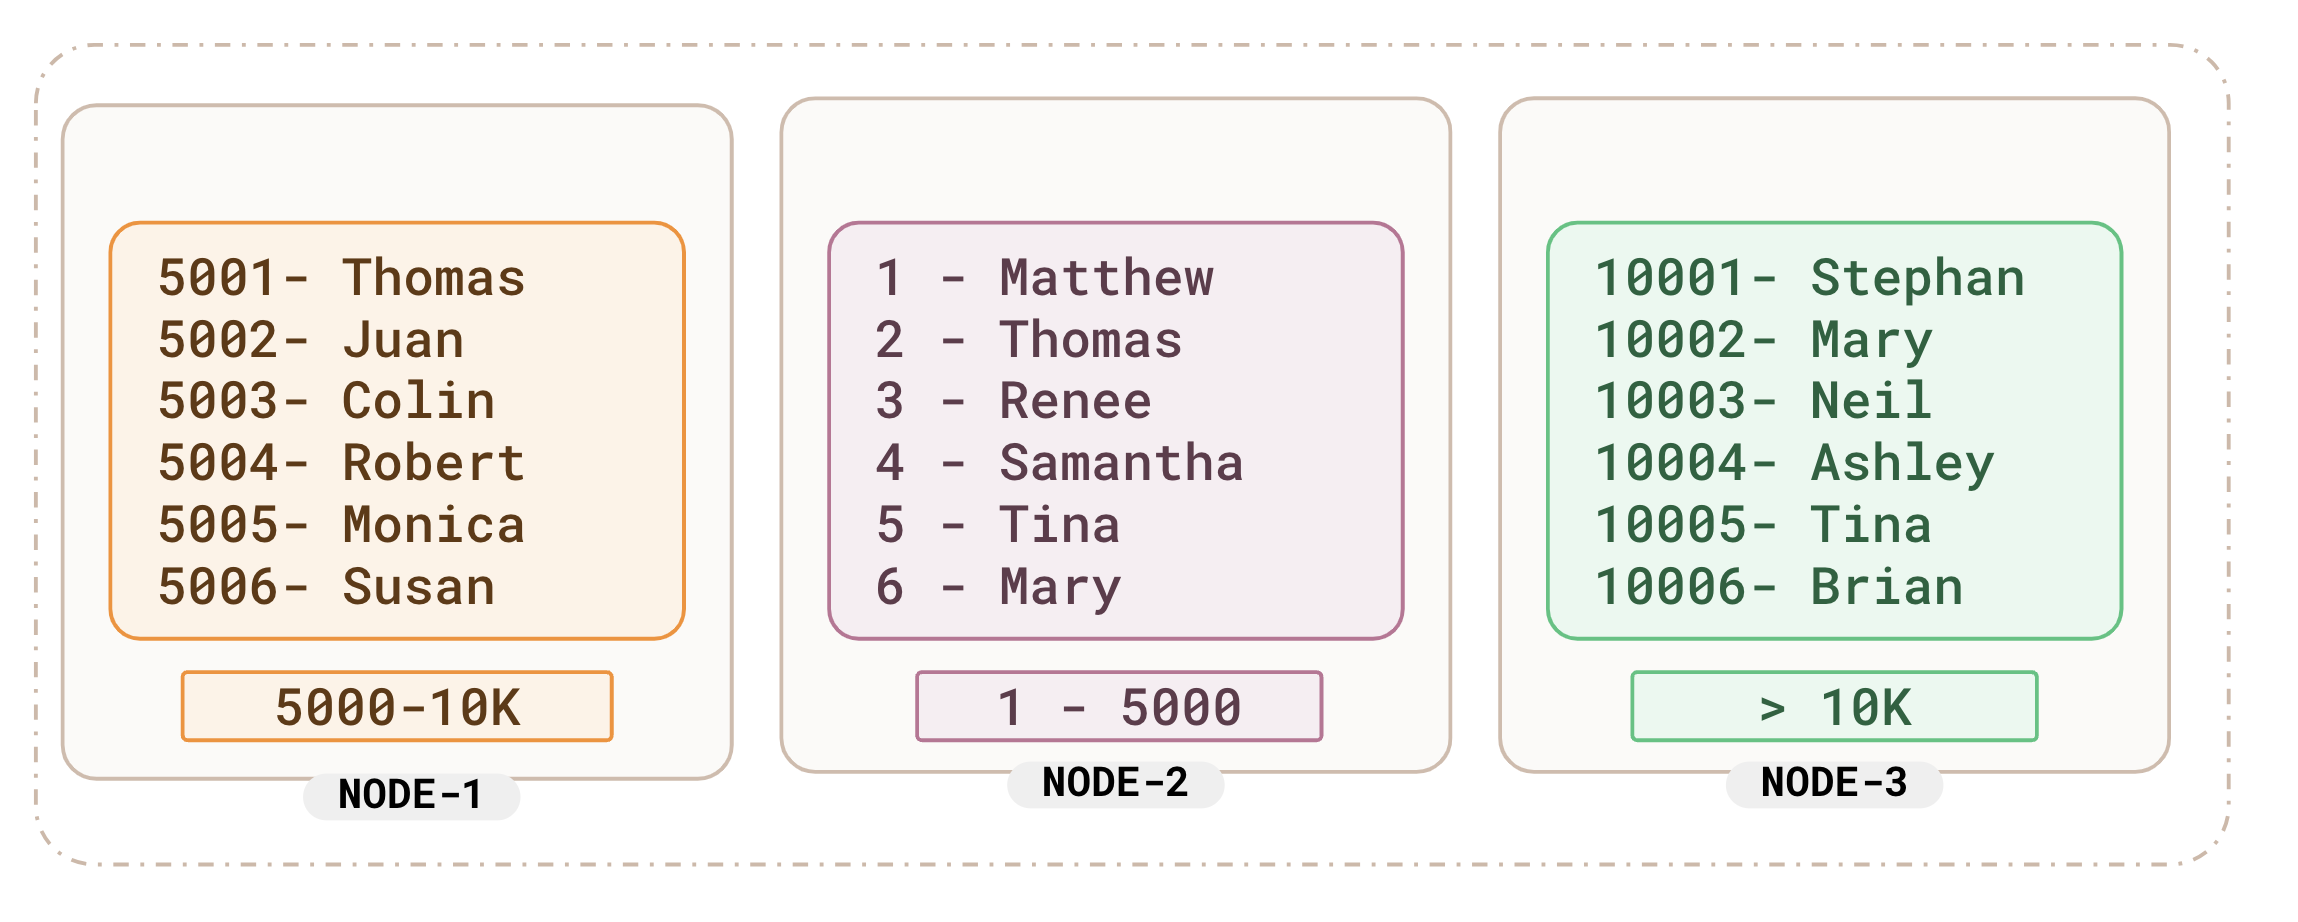
In range sharding, the distribution is based on the actual value of the primary key. For example, if the census table is range-sharded on the id, the data distribution could look like the following:

As the data is stored ordered in the natural sort order of the primary key, contiguous keys like 1,2,3,4 are stored together. This enables range queries to be very efficient. For example:
-- range query
select * from users where id>2 and id<6;
For those migrating from PostgreSQL, range sharding may be a more natural fit, as PostgreSQL also stores data in the order of the primary keys. Range sharding is particularly beneficial if your applications rely on a combination of range and point lookup queries.
Data modeling
Data modeling for distributed SQL databases differs from monolithic PostgreSQL due to the unique challenges and opportunities presented by a distributed architecture. While many principles of relational database design remain consistent, distributed databases require additional considerations to ensure performance, scalability, and consistency across multiple nodes.
Primary key
You must choose the primary key of the table wisely as the distribution of table data across the various nodes in the system depends on the primary key.
Secondary indexes
For improved performance of alternate query patterns that don't involve the primary key, you might have to create secondary indexes. For example, if the primary key of your table is based on the id of the user , but you have query lookups based on the name of the user, you would have to create an index on the name column for optimal performance of your name-based queries.
In YugabyteDB, indexes are global and are implemented just like tables. They are split into tablets and distributed across the different nodes in the cluster. The distribution of indexes is based on the primary key of the index and is independent of how the main table is sharded and distributed. It is important to note that indexes are not colocated with the base table.
Hot shards
The "hot shard" problem in distributed databases refers to a situation where a particular shard in the database receives more traffic compared to other shards, leading to increased latency and performance degradation.
The hot shard problem arises when there is a skewed data distribution or when an specific value or data pattern becomes popular. You can solve this by choosing a different ordering of the primary key columns or distributing your data based on more columns.
Colocated tables
By default, all the rows of the table are distributed across multiple tablets and spread across the different nodes in the cluster. This works well for large tables. But for smaller tables (like lookup or reference), you are better off keeping all the rows together in a single tablet for performance reasons. YugabyteDB supports colocated tables, where all the rows of the table reside just in one tablet and hence on just one node.
Choose colocation for tables with small tables that don't grow much; for example, less than 1 million rows, or smaller than 1 GB.
Schema Migration
After you have a detailed understanding of how data distribution works in YugabyteDB and how it affects your data model, you can export the schema and make appropriate changes. Keep the following in mind when migrating your schema to YugabyteDB.
Export schema
You can use the ysql_dump utility to export a YugabyteDB-friendly version of the schema. This will include some of the schema modifications, like the following:
ysql_dump --schema-only -h source_host -U source_user source_db > schema.sql
If you are using YubabyteDB Voyager, use the yb-voyager export schema command.
Changes to schema
Depending on the use case, your schema may require the following changes. You can also use yb-voyager analyze schema command to analyze the schema and get suggestions for modifications.
Specify PRIMARY KEY inline
When creating the table, decide on the correct primary key and specify it inline as part of the CREATE TABLE definition. Because the distribution of data depends on the primary key, defining or altering the primary key after the data has been loaded would result in a table re-write, which could be an expensive operation depending on the size of the table.
Choose the correct sort order
When defining the primary key for the table and indexes, be sure to pick the sort order (ASC/DESC) based on your common queries. This enhances the performance of ORDER BY clause by avoiding an explicit sort operation.
Colocation
In many scenarios, there may be a large number of database objects (tables and indexes specifically) which hold a relatively small dataset. In such cases, creating a separate tablet for each table and index is inefficient, and colocating these tables and indexes into a single tablet can drastically improve performance.
Enabling the colocation property at a database level causes all tables created in this database to be colocated by default. Tables that hold a large dataset or those that are expected to grow in size over time can be opted out of the colocation group, which would cause them to be split into multiple tablets.
Pre-split large tables
For larger tables and indexes that are hash-sharded, specify the number of initial tablet splits desired as part of the DDL statement of the table. This can help distribute the data of the table across multiple nodes right from the start.
For larger tables and indexes that are range-sharded and the value ranges of the primary key columns are known ahead of time, pre-split them at the time of creation.
Collation limitations
Be aware of the caveats of collation support in YugabyteDB and choose the right collation for your database and tables. For example, not all collations are supported and databases can only be created with "C" collation.
Cache your sequences
Sequences are created with a default cache size of 100. Depending on your application usage, it might be worth choosing a larger cache size. YugabyteDB supports server-side caching of sequences by setting the ysql_sequence_cache_method flag to the value server. This is the recommended value for most applications. Given that multiple connections will use the same cache, provision a much bigger sequence (~10X) cache when opting for server-side caching.
You can set the cache size either during CREATE SEQUENCE or using ALTER SEQUENCE.
Opt for UUIDs over sequences
UUIDs are globally unique identifiers that can be generated on any node without requiring any global inter-node coordination. While server-side caching improves the performance of sequences, there are scenarios like multi-region deployment where using UUIDs would be a better choice for performance.
Importing schema
After completing your schema changes, you can use ysqlsh to import the modified schema onto YugabyteDB as follows:
ysqlsh -h yugabyte_host -U yugabyte_user -d yugabyte_db -f schema.sql
If you are using YubabyteDB Voyager, use the yb-voyage import schema command.
Data migration
The data from the source PostgreSQL database can be exported either using the COPY command to copy data into CSV files, or exported to flat files using ysql_dump as follows:
ysql_dump --data-only --disable-triggers -h source_host -U source_user source_db > data.sql
If you are using YubabyteDB Voyager, use the yb-voyager export data command (recommended).
Import the exported data into YugabyteDB using COPY FROM command or using ysqlsh as follows:
ysqlsh -h yugabyte_host -U yugabyte_user -d yugabyte_db -f data.sql
If you are using YubabyteDB Voyager, use the yb-voyager import data command.
What to migrate
Depending on your business needs you can choose which and how much data you want to migrate at a given point in time.
Big Bang Migration: Migrate all data and applications in one go. This approach is suitable for smaller databases or when a downtime window is acceptable.
Phased Migration: Migrate the data in phases, with part of the application pointing to the old database and part to the new one. This is suitable for larger databases with low downtime tolerance.
Hybrid Approach: Combine the above strategies, migrating non-critical data first, followed by critical data during a planned downtime window.
Regardless of how much data you decide to migrate, you can choose from the following strategies to actually execute the migration.
How to migrate
Offline migration: You can take down the system and import the exported data. This approach is typically used when downtime is acceptable or the system is not required to be available during the migration.
Live migration: Live migration aims to minimize downtime by keeping the application running during the migration process. Data is copied from the source database to the new YugabyteDB cluster while the application is still live, and a final switchover is made after the migration is complete.
Live migration with fall-forward: Live migration with fall-forward is a variant of live migration where, after the application has switched to the new database, there is no option to revert to the old database. This strategy is typically used when the new database is considered stable and there is confidence in the migration process.
Live migration with fall-back: Live migration with fall-back provides a safety net by allowing a return to the original database if issues are encountered after the cutover to the new database. This strategy involves maintaining bidirectional synchronization between the source database and the new YugabyteDB cluster for a period after the migration.
Application migration
When porting an existing PostgreSQL application to YugabyteDB you can follow a set of best practices to get the best out of your new deployment.
Retry transactions on conflicts
YugabyteDB returns different error codes for the various scenarios that go wrong during transaction processing. The error code 40001 (serialization_failure) for retryable transaction conflict errors. You should retry the transactions from the application when encountering these errors.
Distribute load evenly across the cluster
All nodes (YB-TServers) in the cluster are identical and are capable of handling queries. However, PostgreSQL client drivers are designed to communicate only with a single endpoint (node). To use all the nodes of the cluster evenly, queries from the application need to be distributed uniformly across all nodes of the cluster. There are two ways to accomplish this:
-
Load balancer: Use a load balancer to front all the nodes of the cluster. The load balancer should be set to round-robin all requests across the nodes in the cluster.
-
Smart driver: YugabyteDB ships a smart driver in multiple languages that can automatically distribute connections to the various nodes in the cluster with minimum configuration.
Increase throughput
There are many applications where handling a large number of client connections is critical. There are few strategies to accomplish this:
-
Connection pool: Use a connection pool in your application such as the Hikari pool. Using a connection pool drastically reduces the number of connections by multiplexing a large number of logical client connections onto a smaller number of physical connections across the nodes of the YugabyteDB cluster.
-
Increase number of nodes in cluster: The number of connections to a YugabyteDB cluster scales linearly with the number of nodes in the cluster. By deploying more nodes with smaller vCPUs per node, it may be possible to get more connections. For example, a 10 node cluster consisting of 32 vCPU per node can handle 3000 connections; a 20 node cluster with 16 vCPUs per node (which is equivalent to the 10 node, 32 vCPU cluster) can handle 6000 connections.
-
Connection Manager: Enable the built-in connection pooler called YSQL Connection Manager. The connection manager works by multiplexing many client connection over few physical connections to the database. With the connection manager enabled, each node in the cluster will be able to handle more than 10K connections per node.
Post-migration activities
After the migration is complete, several key steps must be taken to ensure the system operates smoothly and without issues. These include verifying the integrity of migrated data, testing system performance, addressing any compatibility concerns, and monitoring the system closely for any unexpected behavior. Properly addressing these aspects will help ensure a seamless transition and the reliable functioning of the system.
Verification
After the migration is complete you need to take steps to verify the migration. You can do this as follows:
- Functional testing: Verify that all application queries work as expected in YugabyteDB.
- Consistency checks: Run data consistency checks between PostgreSQL and YugabyteDB to ensure no data is lost or corrupted during the migration by verifying the database objects and row counts.
Monitoring
Regularly monitor the new YugabyteDB cluster to ensure it is performing efficiently. This includes tracking metrics such as query execution times, CPU usage, memory consumption, and disk I/O. Pay close attention to any errors or warnings that arise, as they can indicate potential issues with the database configuration, queries, or underlying infrastructure.
Tune performance
Because of the distributed nature of YugabyteDB, queries are executed quite differently from Postgres. This is because the latency across the nodes are taken into account by the query planner. Adopting the following practices will help improve the performance of your applications.
-
Single-row transactions: YugabyteDB has optimizations to improve the performance of transactions in certain scenarios where transactions operate on a single row. Consider converting multi-statement transactions to single-statement ones to improve performace.
-
Use On Conflict clause: Use the optional ON CONFLICT clause in the INSERT statement to circumvent certain errors and avoid multiple round trips.
-
Set statement timeouts: Avoid getting stuck in a wait loop because of starvation by using a reasonable timeout for the statements.
-
Stored procedures: Use stored procedures to bundle a set of statements with error handling to be executed on the server and avoid multiple round trips.
Backup and disaster recovery
Establish a comprehensive backup strategy that includes full, incremental, and differential backups, depending on your system's needs. This ensures that you have multiple restore points in case of data loss or corruption. You should schedule backups to run at regular intervals, ideally during off-peak hours, to minimize the impact on system performance. The frequency of backups should be based on how often the data changes and the criticality of the information.
Decommissioning
Before proceeding with decommissioning, thoroughly verify the stability and reliability of the new YugabyteDB cluster. Ensure that it is functioning as expected, with no critical errors, performance issues, or compatibility problems. Once confident in the stability of the new YugabyteDB cluster and after securing necessary backups, proceed with decommissioning the source database. This involves shutting down the source system and ensuring that it is no longer accessible to users or applications.